Capturing Windows Power Events in a Console Application

So you’re writing a console application and you think “Hey, it would be great if I could catch power events so I could:”

  • get all my data in a sane state before a shutdown
  • defer heavy processing until we are back on AC power
  • reinitialize network resources if we just returned from an unexpected sleep state

You fire off a Google search for “Windows Power Events” and you quickly come across this MSDN article that tells you that you need to call the RegisterPowerSettingNotification API function. Super! Then you quickly notice a few problems:

  1. The RegisterPowerSettingNotification function takes either a Window Handle or a SERVICE_STATUS_HANDLE.
    1. You’re a console application so you don’t have a Window handle.
    2. You aren’t running as a service so you can’t call RegisterServiceCtrlHandlerEx to get a SERVICE_STATUS_HANDLE
  2. The minimum supported client is Windows Vista and you would like to at least support Windows XP forward.

Ahh, crap. As far as my (prolonged) search results show, there is no way to receive power events without either having a window handle, running as a service or being a device driver. Period.

Enter the Hidden Window

The best solution to this problem that I’ve come across is to create a hidden window. It seems like such a hack, but it does work! There are a few things you need to be aware of when using this method. As per MSDN recommendations one should generally use a single thread to create all of their windows. The system directs messages to individual windows, so you need to process the message queue on the same thread that created the window*. In a Windows application this is generally all done in WinMain. However for a console application, we likely have other things going on in the main thread, especially if we want the power event notifications to be available early on in the application startup process. Therefore I create a separate thread which will create the hidden window, register for power events, and then continuously process the message loop.

* In fact, the message queue is really the thing that we need in all this so that we can receive the WM_POWERBROADCAST messages. AFAIK, the only ways to get a message queue are via creating a window or running as a service.

Power Events

After you have a thread and create a window you will automatically receive the WM_POWERBROADCAST messages in your message queue for the following power events:

Windows 2000 and Later
PBT_APMPOWERSTATUSCHANGE
PBT_APMRESUMEAUTOMATIC
PBT_APMRESUMESUSPEND
PBT_APMSUSPEND
PBT_POWERSETTINGCHANGE

Windows 2000, Windows XP, and Windows Server 2003 only
PBT_APMBATTERYLOW
PBT_APMOEMEVENT
PBT_APMQUERYSUSPEND
PBT_APMQUERYSUSPENDFAILED
PBT_APMRESUMECRITICAL

As you can see you may not even need to call RegisterPowerSettingNotification at all to get the events you need! In the case of Windows XP, these are all that you are going to get. On Vista and later however, you may still want to register for additional power events. There are several more event types that you can register for, which are described here. The ones that I cared about were:

GUID_ACDC_POWER_SOURCE
GUID_BATTERY_PERCENTAGE_REMAINING
GUID_MONITOR_POWER_ON

Show Me Teh Codez!

I wrote a sample console application in C that creates a hidden window on a separate thread, tries to register for additional power events if they are available, and then processes the message queue until the user enters input twice. It prints the message type of any window message it receives, but it provides additional information for power events. The application has both 32- and 64-bit builds and has been tested on Windows XP Home RTM 32-bit and Windows 7 Home Premium 64-bit.  It is written with Visual Studio 2010 but the code should work on previous versions of VS as well, you’ll just have to migrate the project and solution settings.

NOTE: In order to build for Windows XP RTM/SP1 I targeted the v90 (Visual Studio 2008) toolset. You must have Visual Studio 2008 installed to do this. See my post here on how and why I have to do this.

https://bitbucket.org/zachburlingame/windowspowerevents

Additional Resources

<span class="entry-utility-prep entry-utility-prep-cat-links">Posted in</span> Native, Windows | <span class="entry-utility-prep entry-utility-prep-tag-links">Tagged</span> , | 5 Comments

TortoiseHg Version 2.0 Upgrade Gotcha

I just upgraded to version 2.0 of TortoiseHg the other day and started running into these errors when I went to clone repos out of bitbucket using SSH:

remote: The system cannot find the path specified.
abort: no suitable response from remote hg!

Turns out that on 64-bit Windows machines the install directory changed from C:\Program Files (x86)\TortoiseHg to C:\Program Files\TortoiseHg. As a result, the location of TortoisePlink has changed and needs to be updated in your mercurial.ini file (located in your %USERPROFILE% directory) as such:

ssh = "C:\Program Files\TortoiseHg\TortoisePlink.exe" -ssh -2 -batch -C

A huge thank you goes to Igal Tabachnik for posting a solution to this here.

<span class="entry-utility-prep entry-utility-prep-cat-links">Posted in</span> Version Control, Windows | <span class="entry-utility-prep entry-utility-prep-tag-links">Tagged</span> | Leave a comment

Installing Mercurial and Hosting Repositories with CentOS

In the previous post I discussed some things to consider when publishing mercurial repositories. Here I explain the steps I took to setup and configure Mercurial repository publishing via SSH and HTTPS on CentOS 5.5 x64.

Prerequisites

These are the prereqs for my setup. Most of these instructions will probably work on other distros and web servers, but the exact commands and details will vary.

  • CentOS 5.5
  • Apache 2.x (Installed and Configured)
  • root or sudo access on the server
  • Internet Connection during installation (yes, some of us do development on offline networks)

Download and Install Packages

The mercurial packages that are available directly out of the CentOS repositories and RPMForge for CentOS 5.5 were too old for my liking. I downloaded the latest RPMs (at the time of writing) directly. Update 2011/03/30: Mercurial 1.8.x is now in RPMForge for EL5 so you can get it directly via yum.

sudo yum install python-docutils python-setuptools mercurial mercurial-hgk mercurial-ssh
I ran into an dependency resolution issue because I have the EPEL repo enabled with a higher priority than RPMForge. I added the following line to the [epel] entry in /etc/yum.repos.d/epel.repo to force yum to look for mercurial elsewhere so it pulled from RPMForge.
exclude=mercurial,mercurial-hgk,mercurial-ssh

Create an hg Group

I find it useful to create a group for all of the version control users on the server because I want to support both HTTPS and SSH access. If you are using HTTPS access only, then you don’t need a group here since it will all be done via apache. I used hg here but you could use anything you want like vcs or versioncontrol.

sudo groupadd hg
# Add all committers to the hg group using usermod

Create and Configure a Repo

Note that I go through a few extra hoops here to allow multiple-committers since I want to support both SSH and HTTPS access.

# Create your new Hg repo (or copy the existing one) in /srv/hg
sudo hg init /srv/hg/

# Make the repo writable by the group for a multiple-committers environment
cd /srv/hg/
sudo chgrp hg .hg .hg/* .hg/store/*
sudo chmod g+w .hg .hg/* .hg/store/*
sudo chmod g+s .hg .hg/* .hg/store/data

# Give ownership of Hg repos to the apache user
sudo chown -R apache /srv/hg/

# Setup your .hgignore file to handle files you don't want under version control

# Add your project files to the repo
hg add

# Commit your project
hg commit

Setup HgWeb

There is great documentation on how to do this on the Mercurial Wiki but here are the steps I used.

# Setup Hgweb for HTTP access using mod_python
sudo mkdir /etc/hgweb
sudo mkdir /var/hg

sudo vim /var/hg/hgwebdir.py
########## BEGIN COPY BELOW THIS LINE ###########
#!/usr/bin/env python
#
import cgitb
cgitb.enable()

from mercurial.hgweb.hgwebdir_mod import hgwebdir
from mercurial.hgweb.request import wsgiapplication
import mercurial.hgweb.wsgicgi as wsgicgi

def make_web_app():
    return hgwebdir("/etc/hgweb/hgwebdir.conf")

def start(environ, start_response):
    toto = wsgiapplication(make_web_app)
    return toto (environ, start_response)
############ END COPY ABOVE THIS LINE ############

sudo vim /etc/hgweb/hgwebdir.conf
######### COPY BELOW THIS LINE #############
[collections]
/srv/hg = /srv/hg

[web]
style = gitweb
allow_archive = bz2 gz zip
contact = Your Name, your.email@address.com
allow_push = *
push_ssl = true
######## END COPY ABOVE THIS LINE ###########

Setup modpython_gateway

We need a dynamic landing page to handle access to the collection of all repos available on the box rather. This way we don’t have to setup a static landing page for each and every repo we publish. I’m using the ever popular modpython_gateway script for this.

wget http://www.aminus.net/browser/modpython_gateway.py?format=raw
sudo mv modpython_gateway.py\?format\=raw /var/hg/modpython_gateway.py

# IMPORTANT! Only use the -c flag for the FIRST person you add, drop it for every add after that
sudo htdigest -c /etc/hgweb/users.htdigest "Zach's Mercurial Repository" burly

sudo vim /etc/httpd/conf.d/hgweb.conf
######### BEGIN COPY BELOW THIS LINE ########

        PythonPath "sys.path + ['/var/hg']"
        SetHandler mod_python
        PythonHandler modpython_gateway::handler
        PythonOption wsgi.application hgwebdir::start

        AuthType Digest
        AuthName "Zach's Mercurial Repository"
        AuthDigestProvider file
        AuthUserFile "/etc/hgweb/users.htdigest"

        Require valid-user

        # Redirect all non-SSL traffic automagically
        RewriteEngine On
        RewriteCond %{HTTPS} off
        RewriteRule (.*) https://%{HTTP_HOST}%{REQUEST_URI}

####### END COPY ABOVE THIS LINE ##########

Configure Apache

We need to enable WSGI handling in apache and that we have all the right file permissions. If you don’t have a CA cert you’ll need to setup one up if you want to use SSL. Here is how to do that on CentOS.

sudo vim /etc/httpd/conf/httpd.conf
# Add the Following Lines in their Respective Locations in the Conf
####### BEGIN COPY BELOW THIS LINE ########
LoadModule wsgi_module modules/mod_wsgi.so
AddHandler wsgi-script .wsgi
####### END COPY ABOVE THIS LINE #########

sudo chown -R root.root /etc/hgweb
sudo chown apache.apache /etc/hgweb/users.htdigest
sudo chmod 400 /etc/hgweb/users.htdigest
sudo chown -R apache.apache /var/hg

sudo service httpd restart

Use your Repo!

You should now be able to view your repositories by pointing your browser at http://yermachinenameorip/hg and you should be prompted for the username and password created in your htdigest file from earlier (i.e. not your shell account credentials). Note that due to the re-write rule in our hgweb.conf file, you should automatically be redirected to the SSL version of the site.

You should now be able to clone your repo via https and your htdigest credentials via:

hg clone https://@yermachinenameorip/hg/reponame

or via SSH and your shell account credentials via:

hg clone ssh://@yermachinenameorip/srv/hg/reponame

Maintenance

#--------------------------
# Create a new project
#--------------------------
hg init /srv/hg/<reponame>

# Make the repo writable by the group for a multiple-committers environment
cd /srv/hg/<reponame>
sudo chgrp hg .hg .hg/* .hg/store/*
sudo chmod g+w .hg .hg/* .hg/store/*
sudo chmod g+s .hg .hg/* .hg/store/data

# Give ownership of Hg  repos to the apache user
sudo chown -R apache /srv/hg/<reponame>

hg add
hg commit

#--------------------------
# Add a new user
#--------------------------
useradd  -G hg
passwd

# Set the htaccess password for the user
htpasswd /etc/hgweb/users.htdigest

Additional Resources

<span class="entry-utility-prep entry-utility-prep-cat-links">Posted in</span> Version Control | <span class="entry-utility-prep entry-utility-prep-tag-links">Tagged</span> , , | 2 Comments

Things to Consider When Publishing Mercurial Repositories

Shortcut: If you just want to know HOW I publish my repos locally and not all this babble on WHY, then jump to the post Installing Mercurial and Hosting Repositories with CentOS.

I’ve been using Mercurial as my VCS of choice now for about six months and quite frankly I love it. There were a number of pain points for me with Subversion (although I still use it almost every day) that Hg addressed. One of the items that regularly comes up when switching to a DVCS like Hg is “Where is the central repository?” By the pure nature of a DVCS, there is no requirement to have one. It is often useful however, to have a master or authoritative repository that other developers or clones (more on this later) can use to sync with.

Once you decide to have master a repo, the next question is “How do we access it?” With SVN this was typically accomplished through the use of HTTP with mod_dav or via svn+ssh. Mercurial comes with an utility called hgserve that will publish a repository for others to access, but it doesn’t provide any authentication methods so it’s really only viable on internal trusted networks. Fortunately, Mercurial also supports numerous other methods of publishing a repository. Additionally, there are a number of great repository hosting companies out there, including my personal favorites: BitBucket and Kiln.  I use BitBucket’s free service to host the source code used for posts on this blog and I use Kiln’s (which is so much more than just a source code hosting platform) free service for managing some personal projects.

With all these great free online services, why do I want another repository?

  1. Build Server – I run a TeamCity build server for a number of my personal projects and I would rather it work with a local repository than pull it’s data down from the Internet for every build.
  2. Backup – While the online services certainly have a more robust configuration overall than my little personal server, my data is but drop in their huge bucket. It means a LOT to me though, so having some up-to-date master copy that I control makes me sleep a bit better at night. Furthermore web companies go out of business overnight sometimes, and I don’t want to get caught with my data at the mercy of some company’s financials.
  3. Security – Not all of the things I want under version control do I want out on the Internet. Whether it be some personal project or versioning of my configuration data, it’s nice to have a local sandbox to keep these things in.
  4. Fun – I AM a developer after all – this stuff is fun!

There are 1,271,486 other articles out there on how to publish a Mercurial repository, why another?

I have several specific requirements in how I want to deploy my setup and there was no single source that seemed to address them all. This is more for my own documentation purposes than anything else, but I figured hey, there may be 0.7 other people out there who might benefit from it as well! These requirements are:

  1. User Authentication – I definitely want to require user authentication to get access to the repositories. This knocks out the built-in hgserve. (Yes, it’s running on my internal network, but I’m paranoid like that.)
  2. Multiple Committers – I don’t want to use the same user account for everyone who accesses the repository (including the build server) and it’s plausible that I may give friends access to specific projects that come up from time to time.
  3. No server user shell accounts just for access to repositories – I don’t want to have to create a full-blown shell account on a system just to give a user access to a repository. This knocks out SSH-only solutions.
  4. No stored passwords in hg clients for users with shell accounts on the server – For those of us (like me) who DO have shell accounts on the server, I don’t want to be caching a stored password on my client machines. I would much rather use something like public-key authentication in a case like this. This knocks out hgweb-only solutions.
  5. Support for multiple-repositories – I want a solution that supports publishing and managing access for multiple repositories with minimal effort.

Sidebar

Of note on point three – using an SSH-based solution – is that this is creates a special hell for you when you go to setup a TeamCity Continuous Integration server (or any Windows Service based agent that is accessing your repository in an authenticated manner). You either have to provide a username and password to TeamCity when setting up the VCS Root, which will also correspond to a user login on your server (no, thank you!) or setup public-key authentication. The problem arises when you go to setup public-key auth: How do you get TortoiseHg’s plink the key? It turns out you can but it involves jumping through some mighty hoops. First you have to generate your key, securely transfer it to your build server, convert it to PuTTY’s PPK format, place it and a mercurial.ini file in the correct SYSTEM account’s profile directory deep in the bowels of the Windows directory based on the bitness of your TeamCity install, use PsExec to run plink as the system account to accept the host key and not run into any other problems along the way. Ew.

The Hybrid-Solution

I settled on a hybrid of Apache hgweb and SSH to meet all of my requirements. For those users who already have shell accounts, I can use public-key authentication to both securely access the repositories and avoid having stored passwords on the client machines. For those users who don’t have shell accounts (like the service running the TeamCity build server) I can use HTTPS to provide authenticated access in either a read-only or read-write manner. I’ll provide steps on how to do this in the next post: Installing Mercurial and Hosting Repositories with CentOS.

<span class="entry-utility-prep entry-utility-prep-cat-links">Posted in</span> Version Control, Windows | <span class="entry-utility-prep entry-utility-prep-tag-links">Tagged</span> | Leave a comment

Targeting Windows 2000/XP RTM/XP SP1 from Visual Studio 2010

I’m currently working on a little native C application using the C-runtime libraries (CRT) to detect Windows power events. I ran into a problem when testing my application on Windows XP Professional 32-bit RTM (e.g. “Gold Release”, no service packs). When I attempt to run the application, I get the following error message:

Entry Point Not Found

Entry Point Not Found. The procedure entry point DecodePointer could not be located in the dynamic link library KERNEL32.dll.

Huh?!

After a little digging, it turns out the Microsoft rather quietly discontinued targeting the Windows 2000 and Windows XP RTM/SP1 platforms with Visual Studio 2010. The last release that will target these platforms is Visual Studio 2008.

There were various suggestions on how to workaround this issue including recompiling the CRT, implementing the missing functions in your own w2kcompat.lib, FASM/MASM assembly magic, and reverting to using Visual Studio 2008.  However all of these offered significant drawbacks for me. I do not want to be in the business of supporting a custom compiled version of the CRT. I don’t understand the assembly editing based solutions sufficiently to feel comfortable supporting them on x86 and x64 platforms in the field.

The workaround that works for me and that I ultimately used is to target the Visual Studio 2008 (VC 9.0) Platform Toolset from within my Visual Studio 2010 projects as suggested here and here. There were three key upsides for me with this solution:

  1. This seems like the most reasonable option to support in deployments. No custom builds and no assembly hacking.
  2. I can continue to use VS2k10 and all it’s goodness. (Well, almost. Any feature added in the VC10 runtime won’t be available. )
  3. This modification can be done on a per project (and actually, per Build Configuration) basis, so I don’t have to make system-wide changes to my VS install.

The major downside to this option is that it requires me to have Visual Studio 2008 installed, but this was something I was willing to live with.

One way to accomplish this workaround that was suggested is to place the path to the Visual Studio 2008 VC libs (e.g. “C:\Program Files (x86)\Microsoft Visual Studio 9.0\VC\lib” for 32-bit builds) first in the Additional Library Directories under the Linker options for your project. This messy because you have to do this for every configuration of every project in your solution that needs it and it varies for x86 versus x64 builds. Making matters worse is that the location of these files may vary from system to system, so what works for one developer’s machine may not work for another. Not ideal.

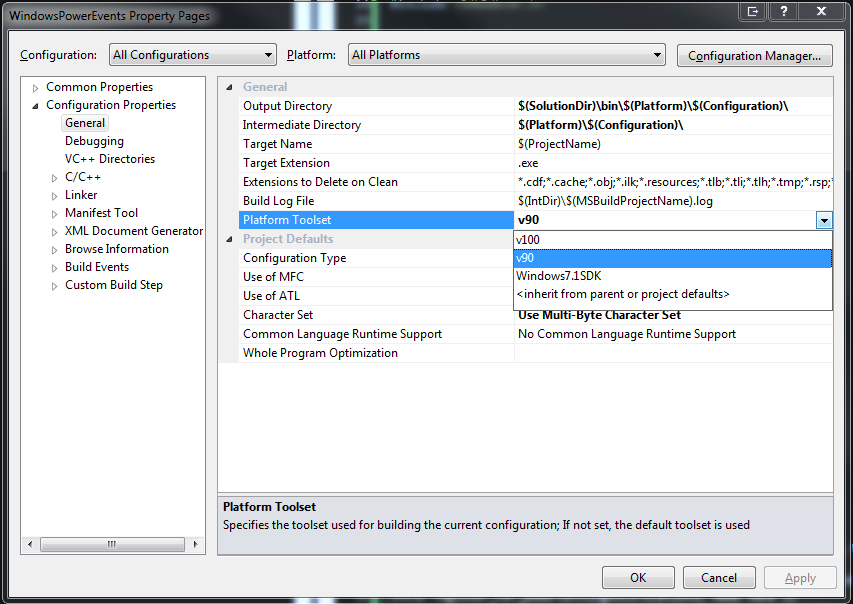
The cleaner and easier way to do this is to set the Platform Toolset in the project’s general properties pane. You still need to do this for each project as well as all configurations and all platforms. However, unlike the previous method, this one uses the same value across configurations and platforms and it’s portable across machines.

Setting the Platform Toolset in Visual Studio 2010

Setting the Platform Toolset in Visual Studio 2010

<span class="entry-utility-prep entry-utility-prep-cat-links">Posted in</span> Native, Visual Studio, Windows | <span class="entry-utility-prep entry-utility-prep-tag-links">Tagged</span> , | 3 Comments

Suppress Unreferenced Parameter/Variable Warnings in Windows C/C++ Applications

I use warning level 4 (/W4) for all of my projects as well as “warnings as errors” (/WX) on Release builds. During development I often run into C4100 warnings for unreferenced parameters or variables that are either:

  1. Currently unused but will be used once development is complete
  2. Due to a specific required signature (e.g. for use in a Windows callback in an API) but that I don’t need

In the past I’ve just used a cast to suppress the warnings like this:

// Suppress C4100 Warnings for Unused Parameters
(void*) param1;
(void*) param2;

I came across a collection of handy macros today in WinNT.h (you should include <Windows.h>):

//
// Macros used to eliminate compiler warning generated when formal
// parameters or local variables are not declared.
//
// Use DBG_UNREFERENCED_PARAMETER() when a parameter is not yet
// referenced but will be once the module is completely developed.
//
// Use DBG_UNREFERENCED_LOCAL_VARIABLE() when a local variable is not yet
// referenced but will be once the module is completely developed.
//
// Use UNREFERENCED_PARAMETER() if a parameter will never be referenced.
//
// DBG_UNREFERENCED_PARAMETER and DBG_UNREFERENCED_LOCAL_VARIABLE will
// eventually be made into a null macro to help determine whether there
// is unfinished work.
//

#if ! defined(lint)
#define UNREFERENCED_PARAMETER(P)          (P)
#define DBG_UNREFERENCED_PARAMETER(P)      (P)
#define DBG_UNREFERENCED_LOCAL_VARIABLE(V) (V)
<span class="entry-utility-prep entry-utility-prep-cat-links">Posted in</span> Windows | <span class="entry-utility-prep entry-utility-prep-tag-links">Tagged</span> , | 2 Comments

Integrating the Subversion Revision into the Version Automatically with .NET

In our final post in this series, we’ll be discussing how to integrate the Subversion information into the file version automatically with .NET. Building on these previous posts, I’ll be discussing how to do this for a .NET project using Visual Studio 2010 Professional and TortoiseSVN.

The source code for this post is available here.

Step 1: Add a Version Project

I find adding a specific Version project to the solution is beneficial. The reason is that we are generating common version info to be used across the entire solution, however the first project in the build order needs to be the one to generate this info. Depending on your project dependencies there may not be an obvious or good place to do this. By adding a Version project and making all other projects depend on it we have an easy place to generate the necessary files.

  1. Add a project named Version to your Solution
  2. Add a reference to Version from all the other projects in your Solution

Step 2: Add a GlobalAssemblyInfo Template

Create a file named GlobalAssemblyInfo.cs.tmpl in the Properties folder of the Version project. Copy the code below into the template and make any desired customizations to match your environment.

Notice the $WCNOW$, $WCNOW$ and $WCMODS?M:$ tokens. We’ll use these to place the necessary Subversion information in the file we generate using SubWCRev.exe.

// This file contains common AssemblyVersion data to be shared across all projects in this solution.
using System.Reflection;

[assembly: AssemblyCompany("Zach Burlingame")]
[assembly: AssemblyProduct("DotNetSVNAutoVersion")]
[assembly: AssemblyCopyright("Copyright © Zach Burlingame 2011")]
[assembly: AssemblyTrademark("")]
[assembly: AssemblyCulture("")]

#if DEBUG
[assembly: AssemblyConfiguration("Debug")]
#else
[assembly: AssemblyConfiguration("Release")]
#endif

// Version information for an assembly consists of the following four values:
//
//      Major Version
//      Minor Version 
//      Revision
//      Build
[assembly: AssemblyVersion("1.0.0.$WCREV$")]
[assembly: AssemblyTitle("Built $WCNOW$ from r$WCREV$$WCMODS?M:$")] // This is visible as the "File Description" on the Details tab of the Explorer pane

NOTE: Originally I also had set the AssemblyFileVersion in the template as well. However, for .NET projects, placing string data in this attribute will generate a warning (like the one below), unlike the FileVersionStr in native projects.

[assembly: AssemblyFileVersion(“1.0.0.$WCREV$$WCMODS?M:$”)]
Warning 1 Assembly generation — The version ‘1.0.0.118M’ specified for the ‘file version’ is not in the normal ‘major.minor.build.revision’ format Version

Step 3: Using SubWCRev to Generate GlobalAssemblyInfo

Next we need to add a pre-build step to our Version project to generate the GlobalAssemblyInfo.cs file from the template using the TortoiseSVN tool called SubWCRev.

The extracted version info includes the revision number, the date time of the build and if there are any local modifications to the working copy. Note that in counter-intuitive fashion, the AssemblyTitle attribute is what sets the Description field when viewed from the Details tab of the Properties pane in Explorer. Meanwhile the AssemblyDescription field isn’t displayed at all and rather is only accessible through API calls against the binary. Why MS did this, I do not know…

  1. Right-click on the Version project
  2. Select Properties
  3. Select the Build Events tab
  4. In the Pre-build event command line box, enter:
    subwcrev.exe "$(SolutionDir)\" "$(ProjectDir)Properties\GlobalAssemblyInfo.cs.tmpl" "$(SolutionDir)Code\App\GlobalAssemblyInfo.cs"

Step 4: Add a link to the GlobalAssemblyInfo.cs file in each project

  1. In Visual Studio, right-click on a project
  2. Select Add->Existing Item
  3. Browse to GlobalAssemblyInfo.cs
  4. Select the file
  5. Click the drop-down arrow next to Add and select Add As Link
  6. Move the link to your Properties folder (optional, but keeps things neat)

Step 5: Update the AssemblyInfo.cs for each project

In order to avoid duplicate annotations for assembly information, you must remove entries from the AssemblyInfo.cs file that appear in the GlobalAssemblyInfo.cs file. In our example here, this is what we end up with:

using System.Reflection;
using System.Runtime.CompilerServices;
using System.Runtime.InteropServices;

// General Information about an assembly is controlled through the following 
// set of attributes. Change these attribute values to modify the information
// associated with an assembly.
[assembly: AssemblyDescription("")]  // This is not visible on the Details tab of the Explorer pane

// Setting ComVisible to false makes the types in this assembly not visible 
// to COM components.  If you need to access a type in this assembly from 
// COM, set the ComVisible attribute to true on that type.
[assembly: ComVisible(false)]

// The following GUID is for the ID of the typelib if this project is exposed to COM
[assembly: Guid("dad09178-814d-43f4-b76d-0fbe29a32544")]

Other Posts in this Series

  1. Mapping Binaries in the Field to Source Code in the Repository
  2. Versioning a Native C/C++ Binary with Visual Studio
  3. Versioning a .NET Assembly with Visual Studio
  4. Integrating the Mercurial Revision into the Version Automatically with Native C/C++
  5. Integrating the Mercurial Revision into the Version Automatically with .NET
  6. Integrating the Subversion Revision into the Version Automatically with Native C/C++
  7. Integrating the Subversion Revision into the Version Automatically with .NET
<span class="entry-utility-prep entry-utility-prep-cat-links">Posted in</span> .NET, Version Control, Visual Studio, Windows | <span class="entry-utility-prep entry-utility-prep-tag-links">Tagged</span> , | Leave a comment

Integrating the Subversion Revision into the Version Automatically with Native C/C++

We’ve covered how to automatically include the mercurial revision into the version. Now how about doing this for Subversion?

The basics of how to accomplish this are much the same as in the mercurial example. The major difference is that I don’t use WSH to generate the version file. Unlike TortoiseHg, which includes the CLI tools for Mercurial, TortoiseSVN does not. Therefore you have two choices:

  1. Download a CLI SVN implementation like SlikSVN and implement a script similar to the one that we did for Hg.
  2. Use the SubWCRev.exe utility that comes with TortoiseSVN to generate your version file from a template

Since I already use TortoiseSVN and SubWCRev has already done the heavy-lifting for me, I’ve decided to go that route. As usual, I’ll be doing my example using Visual Studio 2010 Professional although these techniques should work on other versions of VS as well.

The source code for this post is available here.

Step 1: Setup Basic Versioning

First we need to have the basic building blocks in place, as discussed in Versioning a Native C/C++ Binary with Visual Studio

Step 2: Add an SVN Version Template

Next we create a file named svn_version.h.tmpl in our project. I generally keep it under the Resources filter. This file serves as the basis of the SVN version header that we ultimately want to include in our project. The tokens (e.g. $WCREV$) will be automatically replaced by the SubWCRev utility later.

#ifndef _SVN_VERSION_H_
#define _SVN_VERSION_H_

#define SVN_LOCAL_MODIFICATIONS $WCMODS?1:0$  // 1 if there are modifications to the local working copy, 0 otherwise
#define SVN_REVISION            $WCREV$       // Highest committed revision number in the working copy
#define SVN_TIME_NOW            $WCNOW$       // Current system date &amp; time

#endif

Step 3: Add the Pre-build Step

Finally we need to add a pre-build step which will execute the SubWCRev tool, thus generating the svn_version.h file prior to the binary being built.

  1. Right-click on your project
  2. Select Properties
  3. Click Build Events
  4. Click Pre-Build Event
  5. In the Configuration drop-down, select All Configurations
  6. In the Command Line field, enter:
    SubWCRev.exe $(SolutionDir) $(ProjectDir)\svn_version.h.tmpl $(ProjectDir)\svn_version.h
  7. In the Description field, add a comment such as:
    Generate the svn_version.h file with the necessary repo identify info for versioning

NOTE:If you have multiple projects in the same solution that all need to use the same information from Subversion you have a few choices. One is to put the template and pre-build event in one project which all the other projects depend on and add a link to the svn_version.h file that gets generated. Another option is to create a specific version project that all it does is generate the svn_version.h file and define common version information and then have every project in the solution depends on it so it’s executed first in the build order.

Step 4: Update Version.h

The version.h file we created in the basic versioning post needs to be updated to include the generated svn_version.h file and to make use of its defines.

#include "svn_version.h"

#define STRINGIZE2(s) #s
#define STRINGIZE(s) STRINGIZE2(s)

#define VERSION_MAJOR               1
#define VERSION_MINOR               0
#define VERSION_REVISION            0
#define VERSION_BUILD               SVN_REVISION

#if SVN_LOCAL_MODIFICATIONS
  #define VERSION_MODIFIER "M"
#else
  #define VERSION_MODIFIER
#endif

#define VER_FILE_DESCRIPTION_STR    "Built " STRINGIZE(SVN_TIME_NOW) " from r" STRINGIZE(SVN_REVISION)
#define VER_FILE_VERSION            VERSION_MAJOR, VERSION_MINOR, VERSION_REVISION, VERSION_BUILD
#define VER_FILE_VERSION_STR        STRINGIZE(VERSION_MAJOR)        \
                                    "." STRINGIZE(VERSION_MINOR)    \
                                    "." STRINGIZE(VERSION_REVISION) \
                                    "." STRINGIZE(VERSION_BUILD)    \
                                    VERSION_MODIFIER

#define VER_PRODUCTNAME_STR         "c_svn_autoversion"
#define VER_PRODUCT_VERSION         VER_FILE_VERSION
#define VER_PRODUCT_VERSION_STR     VER_FILE_VERSION_STR

#if LIBRARY_EXPORTS
  #define VER_ORIGINAL_FILENAME_STR VER_PRODUCTNAME_STR ".dll"
#else
  #define VER_ORIGINAL_FILENAME_STR VER_PRODUCTNAME_STR ".exe"
#endif
#define VER_INTERNAL_NAME_STR       VER_ORIGINAL_FILENAME_STR

#define VER_COPYRIGHT_STR           "Copyright (C) 2011"

#ifdef _DEBUG
  #define VER_VER_DEBUG             VS_FF_DEBUG
#else
  #define VER_VER_DEBUG             0
#endif

#define VER_FILEOS                  VOS_NT_WINDOWS32
#define VER_FILEFLAGS               VER_VER_DEBUG

#if LIBRARY_EXPORTS
  #define VER_FILETYPE              VFT_DLL
#else
  #define VER_FILETYPE              VFT_APP
#endif

Step 6: Add SVN Ignore on svn_version.h

Finally, we need to go ahead and add an svn:ignore on svn_version.h because we don’t want its difference checking in every commit and we don’t want it constantly marking the working copy as modified if it’s tracked.

Results

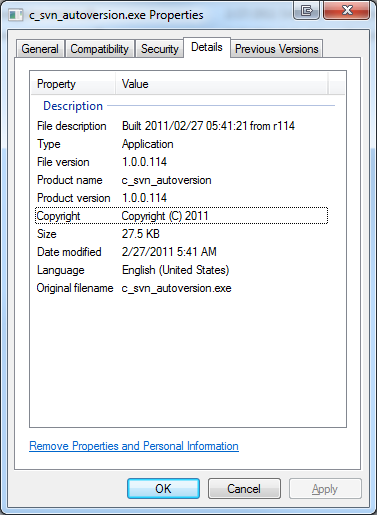
Now when each time you build your projects, the latest Subversion information of the working copy is automatically included in the file version information.

Version info with Subversion

Version info with Subversion

Final Thoughts

So there you have it, you can now automatically include all the necessary information from your Subversion working copy in your build to map them one-to-one with the source code that was used.

Other Posts in this Series

  1. Mapping Binaries in the Field to Source Code in the Repository
  2. Versioning a Native C/C++ Binary with Visual Studio
  3. Versioning a .NET Assembly with Visual Studio
  4. Integrating the Mercurial Revision into the Version Automatically with Native C/C++
  5. Integrating the Mercurial Revision into the Version Automatically with .NET
  6. Integrating the Subversion Revision into the Version Automatically with Native C/C++
  7. Integrating the Subversion Revision into the Version Automatically with .NET
<span class="entry-utility-prep entry-utility-prep-cat-links">Posted in</span> Native, Version Control, Visual Studio | <span class="entry-utility-prep entry-utility-prep-tag-links">Tagged</span> , , | 15 Comments

Integrating the Mercurial Revision into the Version Automatically with .NET

I’ve already shown how you can add the mercurial revision into the version automatically with native C/C++. However, there are some extra hurdles you have to jump to make this work for .NET. The problem is that you can’t use static variables or class data in the assembly attributes – you have to use constant literals or expressions. As a result, we can’t just generate a simple class and reference it in the AssemblyAttributes.

Again I’ll be building on the previous posts and discussing how to do this with Visual Studio 2010 Professional and Mercurial using TortoiseHg, this time for a .NET application. Other versions of Visual Studio should work similarly and other Mercurial packages will work as well, as long as they provide command-line tools that are in the path of your IDE. We’ll be using a GlobalAssemblyInfo file to share common assembly attributes across projects in the same solution as discussed here.

The source code for this post is available here.

Step 1: Add a Version Project

Although I didn’t do this for the native solution, I find adding a specific Version project to the solution is beneficial. The reason is that we are generating common version info to be used across the entire solution, however the first project in the build order needs to be the one to generate this info. Depending on your project dependencies there may not be an obvious or good place to do this. By adding a Version project and making all other projects depend on it we have an easy place to generate the necessary files.

  1. Add a project named Version to your Solution
  2. Add a reference to Version from all the other projects in your Solution

Step 2: Add a GlobalAssemblyInfo Template

Rather than generate the entire contents of the GlobalAssemblyInfo.cs file in the script, where it’s harder to find and edit when needed, we’ll use a template. Create a file named GlobalAssemblyInfo.cs.tmpl in the Properties folder of the Version project. Copy the code below into the template and make any desired customizations to match your environment.

Notice the $REVISION$, $CHANGESET$ and $LOCAL_MODIFICATIONS$ tokens. We’ll use these to place the necessary Mercurial information in the file we generate.

// This file contains common AssemblyVersion data to be shared across all projects in this solution.
using System.Reflection;

[assembly: AssemblyCompany("Zach Burlingame")]
[assembly: AssemblyProduct("DotNetHgAutoVersion")]
[assembly: AssemblyCopyright("Copyright © Zach Burlingame 2011")]
[assembly: AssemblyTrademark("")]
[assembly: AssemblyCulture("")]

#if DEBUG
[assembly: AssemblyConfiguration("Debug")]
#else
[assembly: AssemblyConfiguration("Release")]
#endif

// Version information for an assembly consists of the following four values:
//
//      Major Version
//      Minor Version
//      Revision
//      Build
[assembly: AssemblyVersion("1.0.0.$REVISION$")]
[assembly: AssemblyTitle("$CHANGESET$$LOCAL_MODIFICATIONS$")]   // This is visible as the "File Description" on the Details tab of the Explorer pane

Step 3: Using WSH to Generate Global Assembly

Next we need to add a file to our Version project named hg_version.jse. Personally, I like to add this file under the Properties filter of my project. Copy the code below in to the script file. This code does two things:

  1. Creates GlobalAssemblyInfo.cs
  2. Extracts the desired Mercurial version info from the working copy and places it in the header

The extracted version info includes the full node identity, the revision number and if there are any local modifications to the working copy. Note that in counter-intuitive fashion, the AssemblyTitle attribute is what sets the Description field when viewed from the Details tab of the Properties pane in Explorer. Meanwhile the AssemblyDescription field isn’t displayed at all and rather is only accessible through API calls against the binary. Why MS did this, I do not know…

var fso   = new ActiveXObject("Scripting.FileSystemObject");
var shell = new ActiveXObject("WScript.Shell");
var ForReading = 1, ForWriting = 2, ForAppending = 8;

var projectDir = "../../";

var hgRevNum               = shell.Exec("hg identify --num");
var rev                    = hgRevNum.StdOut.ReadAll();
var hg_revision            = String(rev).replace(/\n/g,"").replace(/\+/g,"");
var hg_local_modifications = '';

if( String(rev).replace(/\n/g, "").indexOf("+") != -1 )
{
   hg_local_modifications = '+';
}

var hgChangeset  = shell.Exec("hg parents --template \"{node}\"");
var changeset    = hgChangeset.StdOut.ReadAll();
var hg_changeset = String(changeset).replace(/\n/g,"");

var hgChangesetShort    = shell.Exec("hg parents --template \"{node|short}\"");
var changeset_short     = hgChangesetShort.StdOut.ReadAll();
var hg_changeset_short  = String(changeset_short).replace(/\n/g,"");

var tmplFile = fso.OpenTextFile( projectDir + 'Properties/GlobalAssemblyInfo.cs.tmpl', ForReading, false );
var strContents = tmplFile.ReadAll();
tmplFile.Close();

strContents = String(strContents).replace(/\$REVISION\$/g, hg_revision );
strContents = String(strContents).replace(/\$LOCAL_MODIFICATIONS\$/g, hg_local_modifications );
strContents = String(strContents).replace(/\$CHANGESET\$/g, hg_changeset );
strContents = String(strContents).replace(/\$SHORT_CHANGESET\$/g, hg_changeset_short )

var asmFile = fso.CreateTextFile( projectDir + '../GlobalAssemblyInfo.cs', ForWriting, true );
asmFile.Write( strContents );
asmFile.Close();

Step 4: Add a Pre-build Event

Add a pre-build event to the Version project to call the hg_version.jse script and generate GlobalAssemblyInfo.cs.

  1. Right-click on the Version project
  2. Select Properties
  3. Select the Build Events tab
  4. In the Pre-build event command line box, enter:
    cscript.exe “$(ProjectDir)\Properties\hg_version.jse”

Step 5: Add a link to the GlobalAssemblyInfo.cs file in each project

  1. In Visual Studio, right-click on a project
  2. Select Add->Existing Item
  3. Browse to GlobalAssemblyInfo.cs
  4. Select the file
  5. Click the drop-down arrow next to Add and select Add As Link
  6. Move the link to your Properties folder (optional, but keeps things neat)

Step 6: Update the AssemblyInfo.cs for each project

In order to avoid duplicate annotations for assembly information, you must remove entries from the AssemblyInfo.cs file that appear in the GlobalAssemblyInfo.cs file. In our example here, this is what we end up with:

using System.Reflection;
using System.Runtime.CompilerServices;
using System.Runtime.InteropServices;

// General Information about an assembly is controlled through the following
// set of attributes. Change these attribute values to modify the information
// associated with an assembly.
[assembly: AssemblyDescription("")]  // This is not visible on the Details tab of the Explorer pane

// Setting ComVisible to false makes the types in this assembly not visible
// to COM components.  If you need to access a type in this assembly from
// COM, set the ComVisible attribute to true on that type.
[assembly: ComVisible(false)]

// The following GUID is for the ID of the typelib if this project is exposed to COM
[assembly: Guid("dad09178-814d-43f4-b76d-0fbe29a32544")]

Conclusion

And there you have it! Now when you build your solution, all your project assemblies will have the latest Mercurial version information included in their meta-data automatically.

Other Posts in this Series

  1. Mapping Binaries in the Field to Source Code in the Repository
  2. Versioning a Native C/C++ Binary with Visual Studio
  3. Versioning a .NET Assembly with Visual Studio
  4. Integrating the Mercurial Revision into the Version Automatically with Native C/C++
  5. Integrating the Mercurial Revision into the Version Automatically with .NET
  6. Integrating the Subversion Revision into the Version Automatically with Native C/C++
  7. Integrating the Subversion Revision into the Version Automatically with .NET
<span class="entry-utility-prep entry-utility-prep-cat-links">Posted in</span> .NET, Version Control, Visual Studio, Windows | <span class="entry-utility-prep entry-utility-prep-tag-links">Tagged</span> , , | 4 Comments

Integrating the Mercurial Revision into the Version Automatically with Native C/C++

Now that we’ve covered why we should include version information in our binaries and how to do that for native C/C++ and managed .NET projects, it’s time to up our game. One of the major shortfalls of the previous solutions is that the version information on the binary didn’t map one-to-one to revisions from source control. As a result, while you may be able to determine the version of a particular file, you can’t easily get to the corresponding source code, if at all. One solution to this is to include the source control revision information in the version so you know exactly what was used to build it. Here I’ll be building on the previous posts and discussing how to do this with Visual Studio 2010 Professional and Mercurial using TortoiseHg for a native C/C++ application. Other versions of Visual Studio should work similarly and other Mercurial packages will work as well, as long as they provide command-line tools that are in the path of your IDE. The steps can be easily modified for use with a .NET project based on the previous post.

Update 2011/02/17: Doing this for a .NET assembly is actually a bit trickier than I originally thought because you can’t use static variables or class data in the assembly attributes – you have to use constant literals or expressions. I’ll do a separate post on how to do this with a .NET project.

The basic concept of how this works is explained in the here. The source code for this post is available here.

Step 1: Using WSH to Generate a Version Header

The first step is to add a file to your project named hg_version.jse. Personally, I add this file under the Resource filter of my project. Copy the code below in to the script file. This code does two things:

  1. Creates hg_version.h
  2. Extracts the desired Mercurial version info from the working copy and places it in the header

The extracted version info includes the full node identity, the short node identity, the revision number, and if there are any local modifications to the working copy.

var fso   = new ActiveXObject("Scripting.FileSystemObject");
var shell = new ActiveXObject("WScript.Shell");

var outFile = fso.CreateTextFile("hg_version.h", true);

var hgRevNum               = shell.Exec("hg identify --num");
var rev                    = hgRevNum.StdOut.ReadAll();
var hg_revision            = String(rev).replace(/\n/g,"").replace(/\+/g,"");
var hg_local_modifications = 0
if( String(rev).replace(/\n/g, "").indexOf("+") != -1 )
{
   hg_local_modifications = 1;
}
outFile.WriteLine( "#define HG_REVISION               " + hg_revision );
outFile.WriteLine( "#define HG_LOCAL_MODIFICATIONS    " + hg_local_modifications );

var hgChangeset  = shell.Exec("hg parents --template \"{node}\"");
var changeset    = hgChangeset.StdOut.ReadAll();
var hg_changeset = String(changeset).replace(/\n/g,"");
outFile.WriteLine( "#define HG_CHANGESET              \"" + hg_changeset +"\"" );

var hgChangesetShort    = shell.Exec("hg parents --template \"{node|short}\"");
var changeset_short     = hgChangesetShort.StdOut.ReadAll();
var hg_changeset_short  = "#define HG_CHANGESET_SHORT        \"" + String(changeset_short).replace(/\n/g,"") + "\"";
outFile.WriteLine( hg_changeset_short );

outFile.Close();

Step 2: Update Version.h

The version.h file we created in a previous post needs to be updated to use the information from the generated header. The mercurial revision number is a human friendly integer and can be used directly in the file version. However, due to the nature of a DVCS it is not guaranteed to be globally unique (and it often won’t be on projects with multiple developers using common workflow patterns). The node identity however, does uniquely identify the changeset globally. We include this information in the file description field which maps the binaries one-to-one with the source code they were built with. It’s important to note that the identity field is not a 16-bit integer and thus cannot be used in the file version field directly. Finally, we want to know if the binary was built with local modifications to the working copy, which would complicate reproducing the build. As a result we append an ‘M’ to the end of the file version string if local modifications are present.

#include "hg_version.h"

#define STRINGIZE2(s) #s
#define STRINGIZE(s) STRINGIZE2(s)

#define VERSION_MAJOR               1
#define VERSION_MINOR               0
#define VERSION_REVISION            0
#define VERSION_BUILD               HG_REVISION

#if HG_LOCAL_MODIFICATIONS
  #define VERSION_MODIFIER "M"
#else
  #define VERSION_MODIFIER
#endif

#define VER_FILE_DESCRIPTION_STR    HG_CHANGESET
#define VER_FILE_VERSION            VERSION_MAJOR, VERSION_MINOR, VERSION_REVISION, VERSION_BUILD
#define VER_FILE_VERSION_STR        STRINGIZE(VERSION_MAJOR)        \
                                    "." STRINGIZE(VERSION_MINOR)    \
                                    "." STRINGIZE(VERSION_REVISION) \
                                    "." STRINGIZE(VERSION_BUILD)    \
                                    VERSION_MODIFIER

#define VER_PRODUCTNAME_STR         "c_hg_autoversion"
#define VER_PRODUCT_VERSION         VER_FILE_VERSION
#define VER_PRODUCT_VERSION_STR     VER_FILE_VERSION_STR

#if LIBRARY_EXPORTS
  #define VER_ORIGINAL_FILENAME_STR VER_PRODUCTNAME_STR ".dll"
#else
  #define VER_ORIGINAL_FILENAME_STR VER_PRODUCTNAME_STR ".exe"
#endif
#define VER_INTERNAL_NAME_STR       VER_ORIGINAL_FILENAME_STR

#define VER_COPYRIGHT_STR           "Copyright (C) 2011"

#ifdef _DEBUG
  #define VER_VER_DEBUG             VS_FF_DEBUG
#else
  #define VER_VER_DEBUG             0
#endif

#define VER_FILEOS                  VOS_NT_WINDOWS32
#define VER_FILEFLAGS               VER_VER_DEBUG

#if LIBRARY_EXPORTS
  #define VER_FILETYPE              VFT_DLL
#else
  #define VER_FILETYPE              VFT_APP
#endif

Step 3: Add the Pre-build Step

Finally we need to add a pre-build step which will execute the hg_version.jse script, thus generating the hg_version.h file prior to the binary being built.

  1. Right-click on your project
  2. Select Properties
  3. Click Build Events
  4. Click Pre-Build Event
  5. In the Configuration drop-down, select All Configurations
  6. In the Command Line field, enter:
    cscript.exe hg_version.jse
  7. In the Description field, add a comment such as:
    Generate the hg_version.h file with the necessary repo identify info for versioning

NOTE:If you have multiple projects in the same solution that all need to use the same information from Mercurial you have a few choices. One is to put the hg_version.jse script in one project which all the other projects depend on and add a link to the hg_version.h file. Another option is to create a specific version project that all it does is generate the hg_version.h file and define common version information and then have every project in the solution depends on it so it’s executed first in the build order.

Results

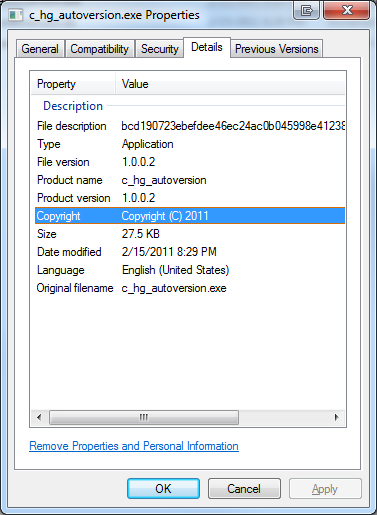
Now when each time you build your projects, the latest Mercurial information of the working copy is automatically included in the file version information.

Version Info with Mercurial

Version Info with Mercurial

Final Thoughts

So there you have it, you can now automatically include all the necessary information from your Mercurial working copy in your build to map them one-to-one with the source code that was used. In an upcoming post I’ll discuss how to do this using Subversion as your VCS.

Other Posts in this Series

  1. Mapping Binaries in the Field to Source Code in the Repository
  2. Versioning a Native C/C++ Binary with Visual Studio
  3. Versioning a .NET Assembly with Visual Studio
  4. Integrating the Mercurial Revision into the Version Automatically with Native C/C++
  5. Integrating the Mercurial Revision into the Version Automatically with .NET
  6. Integrating the Subversion Revision into the Version Automatically with Native C/C++
  7. Integrating the Subversion Revision into the Version Automatically with .NET
<span class="entry-utility-prep entry-utility-prep-cat-links">Posted in</span> Native, Version Control, Visual Studio, Windows | <span class="entry-utility-prep entry-utility-prep-tag-links">Tagged</span> , | 5 Comments